UltiMaker Print Cores AA-DD
£133.00 – £460.00 ex VAT
The UltiMaker Factor 4 uses two print cores in the print head, which can easily be changed. There are different types of print cores:
- Type AA: for printing build materials and UltiMaker Breakaway material
- Type BB: for printing water-soluble support material
- Type CC: for printing composite materials
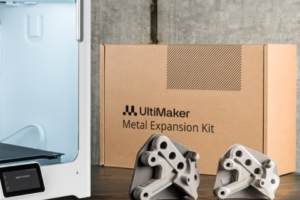
- Type DD: for printing ceramic support material (in combination with the Metal Expansion Kit)
- Type HT: for printing high-temperature materials such as UltiMaker PPS CF
The print cores contain information on a small chip so that the printer always knows which print cores are installed and which materials can be used with these cores.
The UltiMaker Factor 4 uses two print cores in the print head, which can easily be changed. There are different types of print cores:
- Type AA: for printing build materials and UltiMaker Breakaway material
- Type BB: for printing water-soluble support material
- Type CC: for printing composite materials
- Type DD: for printing ceramic support material (in combination with the Metal Expansion Kit)
- Type HT: for printing high-temperature materials such as UltiMaker PPS CF
The print cores contain information on a small chip so that the printer always knows which print cores are installed and which materials can be used with these cores.
Tip: Learn more about UltiMaker print cores in general, or their compatibility with different printers and materials.
Install print cores
During the welcome setup, the printer will guide you to install the print cores included in the starter kit. Follow the instructions on the display.
It is possible to install different print cores if other types were purchased separately. However, for the first print, it is strongly recommended to start with the default setup.
Note: Factor 4, like all UltiMaker dual-extrusion printer models that use print cores, always requires two print cores to be installed in the print head when starting a print, even for single-extrusion print jobs.
Change print cores
Print cores can be easily changed on the UltiMaker Factor 4 by using the procedure from the menu. The printer will guide you through the steps. You can also choose to only load or unload a print core.
- In the Configuration menu, select the print core you want to change and select Change.
- Wait for the print head to stop moving before opening the glass door of the build chamber.
- Gently open the print head bracket. Select Confirm when completed.
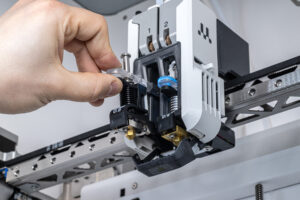
- Squeeze the print core lever upward and slide the print core out of the print head.
Note: Do not touch the contact points on the back side of the print core with your fingers. Always only hold the print core at the levers.
- Insert a different print core by squeezing the lever upward and sliding it into the print head slot until you hear a click.
- Close the bracket and select Confirm when completed.
Note: Keep hands out of the build chamber after selecting Confirm as the print head will move back to its home position.
 |
|
|
|
After changing the print cores, close the build chamber door again. The printer automatically detects the type of print core that was installed. When the printer is connected to a network, the changed configuration information will automatically be available in UltiMaker Cura.
Note: It is recommended to always use the process in the menu to change or unload print cores. Manually removing a print core while it is active (heating up or cooling down) will lead to errors. Reboot the printer to resolve the error.
Additional information
| Print Core | Print Core – AA 0.4mm, Print Core – AA 0.8mm, Print Core – BB 0.4mm, Print Core – BB 0.8mm, Print Core – CC 0.4mm, Print Core – CC 0.6mm, Print Core – DD 0.4mm, Print Core AA 0.25mm |
|---|